
Introduction
In this tutorial we are learning to Use Multiple Buttons on 1 Analog Pin Arduino Tutorial, In the world of electronics, buttons play a crucial role in user interaction and control. But what if you have multiple buttons and limited pins available on your Arduino Uno? Fear not! In this article, we will explore how to connect and read multiple buttons using just one analog pin. By employing a clever technique and a few resistors, you can maximize the functionality of your Arduino projects without sacrificing precious pins.
Hardware Required
You will need the following components: for Use Multiple Buttons on 1 Analog Pin Arduino Tutorial
| Components | # | Buy From Amazon |
|---|---|---|
| Arduino UNO | 1 | Buy Now |
| Push Buttons | 4 | Buy Now |
| Resistors 330Ω or 220Ω | 4 | Buy Now |
| Jumper Wires | Few | Buy Now |
| Breadboard | 1 | Buy Now |
Understanding Multiple Buttons on a Single Analog Pin
Traditionally, buttons are connected to digital pins on an Arduino board, with each button requiring a separate pin. However, by utilizing the analog input capabilities of Arduino, we can implement a method called “analog button reading” to handle multiple buttons on a single pin. This technique takes advantage of the varying resistance values produced by different buttons when pressed.
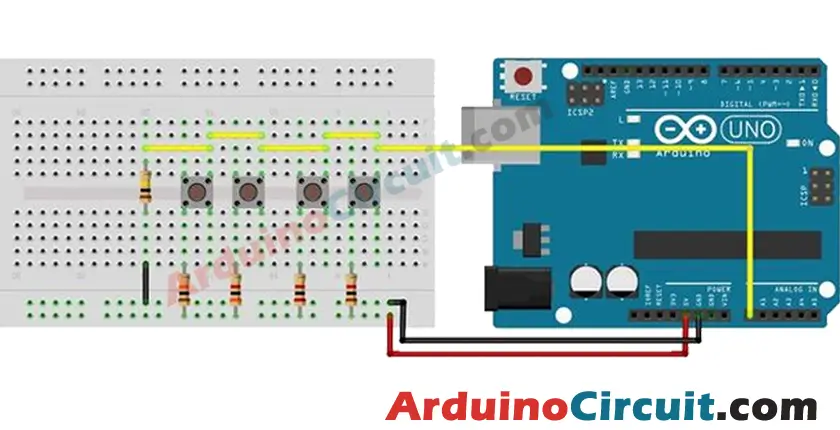
Circuit Setup
- Connect one terminal of each button to a common ground (GND) on the Arduino board.
- Connect the other terminal of each button to a unique analog input pin on the Arduino (e.g., A0, A1, A2, A3).
- Connect a resistor (e.g., 330 Ohm or 220 Ohm) between each button terminal and the corresponding analog input pin.
Circuit Diagram
Reading Multiple Buttons:
To read the state of multiple buttons on a single analog pin, follow these steps:
- Set up the necessary variables: Declare variables to store the analog pin number, button values, and threshold values for button detection.
- Configure the pinMode: In the setup() function, configure the corresponding analog pin as an input using the pinMode() function.
- Read analog values: In the loop() function, use the analogRead() function to read the analog value from the chosen pin.
- Button detection: Compare the analog value read from the pin with predefined threshold values to determine if a button is pressed. Assign unique identifiers or actions to each button based on the detected analog value range.
- Perform desired actions: Use conditional statements or switch-case statements to perform specific actions based on the button press detection.
Installing Arduino IDE Software
First, you will require to Download the updated version of Arduino IDE Software and Install it on your PC or laptop. if you Learn How to install the Arduino step-by-step guide then click on how to install Arduino Button given Blow
Code
//For more Projects: www.arduinocircuit.com

//Constants
const int yellowLed = 2;
const int redLed    = 3;
const int blueLed   = 4;
const int greenLed  = 5;

//Variables
int buttonValue; //Stores analog value when button is pressed
void setup()
{
	pinMode(yellowLed, OUTPUT);
	pinMode(redLed, OUTPUT);
	pinMode(blueLed, OUTPUT);
	pinMode(greenLed, OUTPUT);
}

void loop()
{
	buttonValue = analogRead(A0); //Read analog value from A0 pin

	//For 1st button:
	if (buttonValue>=1010 && buttonValue<=1015){
		digitalWrite(yellowLed, HIGH);
	}
	//For 2nd button:
	else if (buttonValue>=1000 && buttonValue<=1008){
		digitalWrite(redLed, HIGH);
	}
	//For 3rd button:
	else if (buttonValue>=990  && buttonValue<=998){
		digitalWrite(blueLed, HIGH);
	}
	//For 4th button:
	else if (buttonValue>=870  && buttonValue<=880){
		digitalWrite(greenLed, HIGH);
	}
	//No button pressed, turn off LEDs
	else{
		digitalWrite(yellowLed, LOW);
	    digitalWrite(redLed, LOW);
	    digitalWrite(blueLed, LOW);
	    digitalWrite(greenLed, LOW);
	}
	delay(100);
}
Applications and Further Development
By implementing multiple buttons on a single analog pin, you can conserve precious digital pins on your Arduino Uno board. This technique is particularly useful when working with projects that require a large number of buttons or have limited pin availability. You can apply this method in various applications, including:
- Gaming consoles and controllers
- Musical instruments and MIDI interfaces
- User interfaces for menu navigation
- Control panels for home automation systems
Conclusion
With a clever circuit setup and the use of resistors, you can efficiently read multiple buttons using just one analog pin on your Arduino Uno. This technique offers a practical solution when digital pins are limited or when you need to incorporate numerous buttons in your projects. By implementing this method, you can expand the functionality of your Arduino projects while optimizing pin usage. So, go ahead and unleash the full potential of your Arduino Uno with multiple buttons on a single analog pin!


