Introduction
In this tutorial, we will understand how to interface SG-90 SG90 Servo Motor with Arduino Uno and how to control servo motors with Arduino. Servo motors are very famous and mostly operated in many other Arduino projects because servo motors are easy to use and provide great position control.
The Arduino Uno board transfers a PWM signal to the servo motor, which progresses it through an IC on the circuit board to calculate the rotation direction to operate the motor. Then, the circuit gives the position to the swing arm by a reduction gear. At that exact time, the position detector delivers a location signal to determine whether or not the set location has arrived.
Hardware Required
You will require the following Hardware Components for the Interfacing of the SG-90 SG90 Servo Motor with Arduino.
| Components | # | Buy From Amazon |
|---|---|---|
| Arduino UNO | 1 | Buy Now |
| SG90 Servo Motor | 1 | Buy Now |
| Jumper Wires | – | Buy Now |
| Breadboard | 1 | Buy Now |

What is SG-90 Servo Motor?
SG90 Servo Motor is a small and economical type of servo motor that is commonly used in various robotic and automation projects. It is a type of rotary actuator that provides precise control over the angular position of a device. The SG90 is a 9g micro servo motor with a torque of 1.8 kg/cm and a rotation angle of approximately 180 degrees.
The main application of SG90 Servo Motors is in small-scale hobby projects such as remote-controlled cars, robots, and aircraft. These motors can be used to control the position of the steering wheel, flaps, and other parts that need precise positioning. In addition, the SG90 Servo Motor is also commonly used in DIY projects like robotic arms, grippers, and various other mechanical devices that require precise control over their movement.
How Servo Motors Work?
A hobby servo typically consists of four main components: a DC motor, a gearbox, a potentiometer, and a control circuit. The DC motor is a high speed and low torque, but the gearbox is used to reduce the speed to around 60 RPM while simultaneously increasing the torque. The gearbox is an essential component of the servo as it allows for precise movements to be made by the servo.
The potentiometer is used to provide feedback to the control circuit, allowing it to adjust the servo’s position accurately. The control circuit uses this feedback to control the movement of the servo motor. Overall, the combination of these components allows the hobby servo to be used in a wide variety of applications that require precise movements, such as robotics and remote control vehicles.

In a hobby servo, the potentiometer is attached to the output shaft or the final gear. As the motor rotates, the potentiometer also rotates, producing a voltage that is proportional to the absolute angle of the output shaft. The control circuit compares this potentiometer voltage to the voltage coming from the signal line. If necessary, the controller activates an integrated H-bridge that enables the motor to rotate in either direction until the two signals are in sync and the difference between them is zero.
To control a servo motor, a series of pulses are sent through the signal line. The frequency of the control signal should be 50Hz or a pulse should occur every 20ms. The width of the pulse determines the angular position of the servo. Hobby servos can typically rotate up to 180 degrees, but they have physical limits to their travel. By varying the pulse width, the servo can be made to rotate to any desired angle within its range of travel.
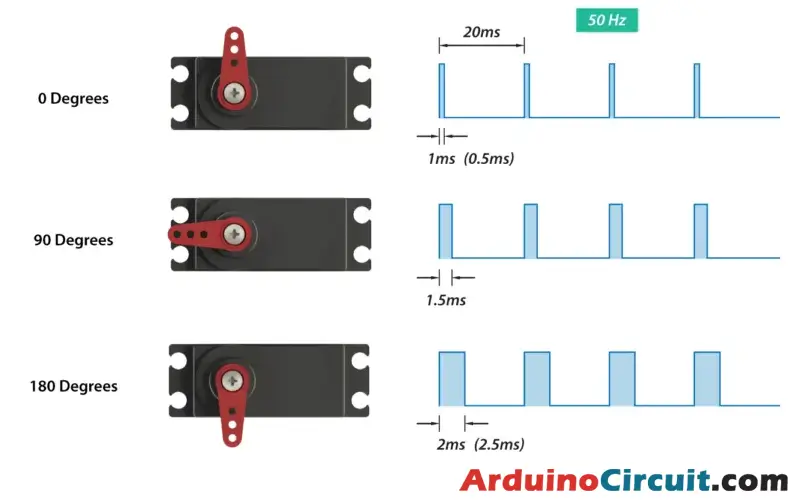
Typically, in hobby servos, a pulse with a duration of 1ms corresponds to a 0-degree position, a 1.5ms pulse corresponds to a 90-degree position, and a 2ms pulse corresponds to a 180-degree position. However, it’s important to note that the minimum and maximum durations of the pulses can vary between different brands and models of servos. In some cases, the pulse duration for a 0-degree position could be 0.5ms, and the pulse duration for a 180-degree position could be 2.5ms. It’s always important to consult the manufacturer’s specifications for a particular servo to determine the correct pulse duration for a desired position.
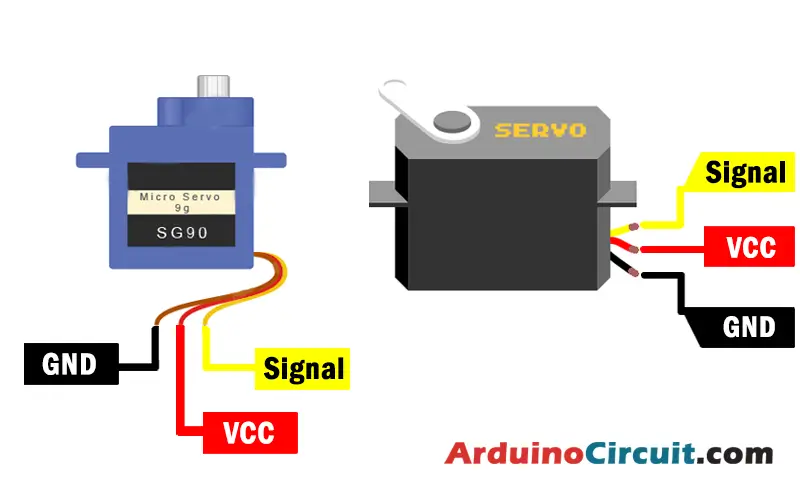
SG90 Servo Pinout
| Pin Name | Pin Description |
|---|---|
| Signal | Signal or PWM pin |
| VCC | VCC, +5V Pin |
| GND | Ground Pin |
SG90 Servo Specifications
| Stall Torque | 1.2kg·cm @4.8V, 1.6kg·cm @6V, |
| Operating Voltage | 3.5 – 6V |
| No Load Current | 100mA |
| Stall Current | 650mA |
| Max Speed | 60 degrees in 0.12s |
| Weight | 9g |
Circuit Diagram
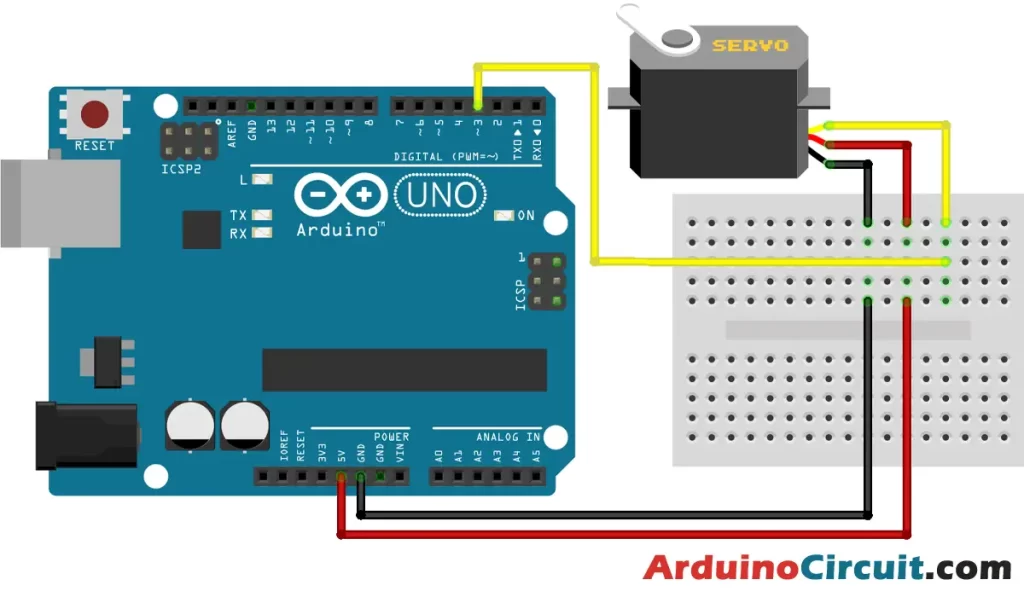
Circuit Connection
The circuit connections for this tutorial are very easy as the servo motor includes 3 wires. The red wire of the servo connected to the 5V pin of the Arduino. The Black wire of the servo connects to the GND of Arduino. And the yellow wire (control pin of the servo) connects to Arduino pin 8. This finalizes the circuit connections of the servo motor with Arduino.
| Arduino | Servo Motor |
|---|---|
| Pin 3 | Signal |
| 5v | VCC |
| GND | GND |
Installing Arduino IDE Software
First, you will require to Download the updated version of Arduino IDE Software and Install it on your PC or laptop. if you Learn How to install the Arduino step-by-step guide then click on how to install Arduino Button given Blow
Installing Libraries
Now when you are Ready to upload the code, to the Arduino Board you will need first to add the Following Libraries in Arduino, If you Learn How to add the library in the Arduino step-by-step guide click on how to install the library Button given Blow
Code
//For more Projects: www.arduinocircuit.com
#include <Servo.h>
Servo myservo;  // create servo object to control a servo
void setup() {
  myservo.attach(3);  // attaches the servo on pin 3 to the servo object
}
void loop() {
  myservo.write(90); // sets the servo position to 90 degrees
  delay(1000);       // waits for 1 second
  myservo.write(0);  // sets the servo position to 0 degrees
  delay(1000);       // waits for 1 second
}
Explanation
First, we need to include a library called “Servo.h” to be able to control various servo motors. If you don’t already have this library in your Arduino IDE, then you can go to “tools” à “Manage Libraries…” and type “Servo” in the Library Manager and install the one from “Michael Margolis, Arduino”.
Next, we declare a variable called “servo”. In void setup function, we use the servo.attach function to tell the Arduino board that the control pin of the servo motor is attached to pin 8 of Arduino (the function attaches the servo variable to the pin). The servo.write function is used to tell the servo the degree to which it should turn. At the beginning the default state of servo is considered as zero degree we keep this as origin position that is zero degrees. So we write servo.write(0). Then a delay function is used to create a delay of 2ms.
Next, in void loop, we use the servo.write function again to tell the servo to turn to 180 degrees and the delay function will hold this position for 1ms. Then the servo is instructed again to go back to 0 degrees, as we had initialized before. The delay function will hold this position for 1ms. This is repeated until the power is disconnected or servo is disconnected.
Applications
- Robotics: The SG-90 SG90 Servo Motor is commonly used in small-scale robots for controlling the movement of joints, arms, and other parts.
- RC Cars and Aircraft: The SG90 Servo Motor is used in remote-controlled vehicles, such as cars and aircraft, for precise control over steering, flaps, and other functions.
- Animatronics: The SG90 Servo Motor is often used in animatronics projects, such as animatronic puppets and Halloween costumes, to control the movement of joints and appendages.
- Model Making: The SG90 Servo Motor is frequently used in model-making projects, such as architectural models and train layouts, to control doors, bridges, and other moving parts.
- Industrial Automation: The SG90 Servo Motor can also be used in industrial automation systems for precise control over various functions, such as conveyor belt systems and material handling equipment.
- DIY Projects: The SG90 Servo Motor is popular among DIY enthusiasts for various projects, such as robotic arms and grippers, due to its small size and low cost.
Conclusion
This is a beginner project. It focuses on controlling an actuator, SG-90 SG90 Servo Motor, using Arduino Uno and Arduino IDE. It delivers a strong primary foundation in dealing with actuators and supports beginners jump into more fun with actuators.