Introduction
In this tutorial, we will make an RGB LED Code | Arduino Tutorial, through the steps to connect an RGB LED to an Arduino board, write the necessary code to control the LED, and create different colors and lighting effects. We will start with a basic example that cycles through different colors, and then move on to more advanced examples that allow you to set the color of the LED using values from 0 to 255 for each of the red, green, and blue channels.
Arduino is a popular open-source electronics platform that allows you to easily create interactive projects. With its easy-to-use programming environment, it is possible to control an RGB LED with an Arduino board, enabling you to create various lighting effects and color combinations.
What is RGB Led?
RGB LED is a type of LED that is capable of producing a wide range of colors by mixing different amounts of red, green, and blue light. It is commonly used in various projects that involve colorful lightings, such as decoration, signboards, and artistic displays.
Hardware Required
You will need the following components for the RGB LED Code | Arduino Tutorial
| Components | # | Buy From Amazon |
|---|---|---|
| Arduino UNO | 1 | Buy Now |
| RGB Led | 1 | Buy Now |
| Resistor 220Ω | 3 | Buy Now |
| Jumper Wires | Few | Buy Now |
| Breadboard | 1 | Buy Now |
Pinout

Pin Configuration
| Pin Name | Pin Type |
|---|---|
| R | Red Pin |
| G | Green Pin |
| B | Blue Pin |
| Common | (Cathode -) Pin connected to GND |
Circuit Diagram
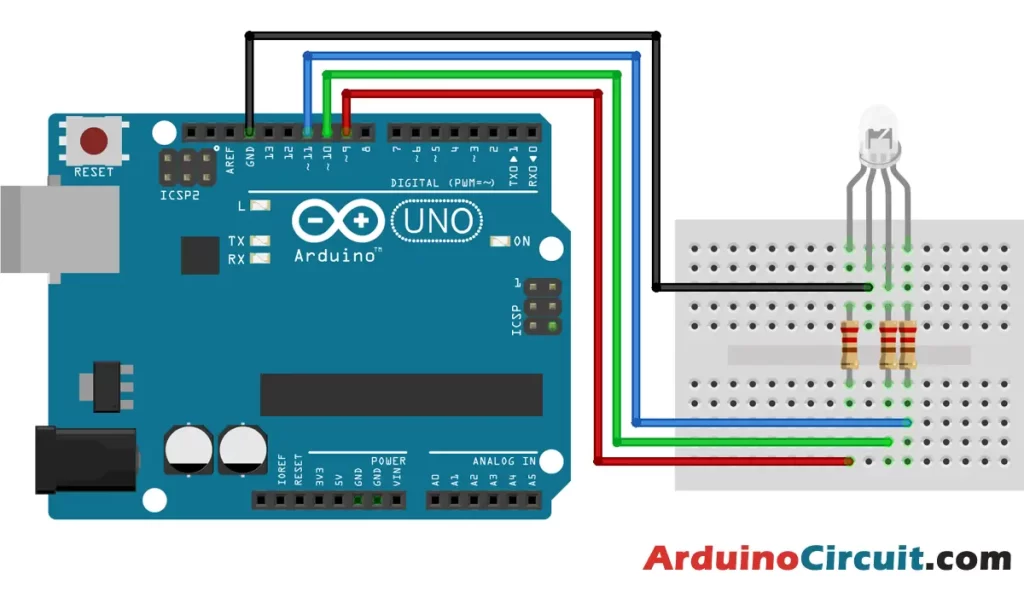
Circuit Connection
- Connect the 2nd Middle Pin of the RGB LED to the GND pin on the Arduino board.
- Connect the three shorter pins of the RGB LED to three different digital pins on the Arduino board. For this example, we’ll use pins 9, 10, and 11.
- Connect a 220 Ohm resistor between each of the shorter pins of the LED and the ground rail on the breadboard.
- Connect the Arduino board to your computer with a USB cable.
- Open the Arduino IDE on your computer and create a new sketch.
- In the sketch, write the following code:
| Arduino | RGB Led |
|---|---|
| 9 Pin | R Pin |
| 10 Pin | G Pin |
| 11 Pin | B Pin |
| GND | Common |
Installing Arduino IDE Software
First, you will require to Download the updated version of Arduino IDE Software and Install it on your PC or laptop. if you Learn How to install the Arduino step-by-step guide then click on how to install Arduino Button given Blow
Code
To expand on the previous tutorial, here is an example code that allows you to set the color of the RGB LED using values from 0 to 255 for each of the red, green, and blue channels:
//For more info Visits: www.arduinocircuit.com
int redPin = 9;
int greenPin = 10;
int bluePin = 11;

void setup() {
  pinMode(redPin, OUTPUT);
  pinMode(greenPin, OUTPUT);
  pinMode(bluePin, OUTPUT);
}

void loop() {
  // Set the LED to red
  setColor(255, 0, 0);
  delay(1000);

  // Set the LED to green
  setColor(0, 255, 0);
  delay(1000);

  // Set the LED to blue
  setColor(0, 0, 255);
  delay(1000);

  // Set the LED to yellow
  setColor(255, 255, 0);
  delay(1000);
}

void setColor(int red, int green, int blue) {
  analogWrite(redPin, red);
  analogWrite(greenPin, green);
  analogWrite(bluePin, blue);
}
Explanation
In this example, we first define the pins for each of the red, green, and blue channels, and then set them to output mode in the setup function. The loop function calls the setColor function with different values for each of the colors and sets a delay of one second between each color change.
The setColor function takes three integer arguments representing the values for the red, green, and blue channels, and uses the analogWrite function to set the brightness of each channel. The analogWrite function takes values from 0 to 255, where 0 is fully off and 255 is fully on.
With this code, you can experiment with different color combinations and create your own lighting effects!
Applications
- Lighting and decoration – You can use the RGB LED with Arduino to create colorful lighting and decoration for your room or your project. For example, you can create a mood light that changes color depending on the time of day, or use it to create a festive display for a special occasion.
- Signboards and displays – You can use the RGB LED with Arduino to create eye-catching signboards and displays. For example, you can create a scrolling LED sign that displays different messages in different colors, or use it to create a large-scale display that changes color and pattern.
- Artistic displays – You can use the RGB LED with Arduino to create artistic displays that respond to different inputs. For example, you can create an interactive installation that changes color and pattern depending on the movements of people or objects.
- Education and experimentation – You can use the RGB LED with Arduino to teach or learn about the principles of color mixing and light. For example, you can create an experiment that demonstrates how different combinations of red, green, and blue light can create different colors.