
Introduction
In this tutorial, we will learn how to use and interface Relay Module with Arduino | Arduino Tutorial. Relay modules are versatile components that allow you to control high-power devices using low-power signals from microcontrollers like Arduino. In this comprehensive guide, we will explore the working principle and features of the Relay Module. Additionally, we will learn how to interface it with an Arduino UNO to create a practical example: controlling a bulb’s illumination based on ambient light detected by an LDR sensor. By the end of this tutorial, you will have the knowledge and skills to integrate the Relay Module into your projects, enabling you to remotely control devices with ease. So, let’s delve into the world of relay control with Arduino and empower your projects with efficient high-power switching!
Hardware Required
You will require the following Hardware Components for interfacing Relay Module with Arduino | Arduino Tutorial.
| Components | # | Buy From Amazon |
|---|---|---|
| Arduino UNO | 1 | Buy Now |
| Relay Module | 1 | Buy Now |
| LDR Sensor | 1 | Buy Now |
| Bulb | 1 | Buy Now |
| Jumper Wires | Few | Buy Now |
| Breadboard | 1 | Buy Now |
What is Relay Module?
The Relay Module is an electromechanical switch that uses an electromagnetic coil to mechanically control the opening and closing of electrical contacts. It provides isolation between low-power control signals and high-power devices, making it ideal for applications where high voltage or current need control safely. The Relay Module typically consists of a control circuit, an electromagnet, and switching contacts. When a low-power control signal (such as from Arduino) applies to the coil, it generates a magnetic field that attracts or releases the switching contacts, thereby connecting or disconnecting the high-power load.
Pinout
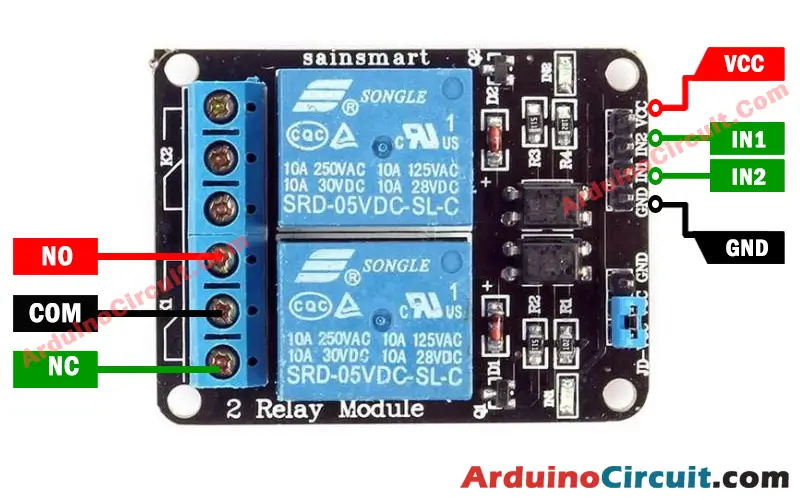
The Normally Open (NO) contact is a type of contact that is open (not making contact) when the relay is not energize. When the relay is energize, the NO contact is closed, and current can flow through the circuit. The NO contact is used in applications where you want to interrupt the circuit when the relay is activated.
The Normally Closed (NC) contact is a type of contact that is closed (making contact) when the relay is not energized. When the relay is energized, the NC contact is opened, and the circuit is interrupted. The NC contact uses in applications where you want to maintain a connection between the circuits when the relay is not activate.
COM:- This is a Common pin
Pin Configuration
| Pin Name | Pin Type |
|---|---|
| VCC | Power Supply |
| GND | Ground Pin |
| IN1 | Analog Pin |
| IN2 | Digital Pin |
| NO | Normally Open |
| COM | Common |
| NC | Normally Closed |
Specifications
- Voltage and Current Rating: The Relay Module’s voltage and current ratings determine the maximum load it can handle. Make sure to choose a relay module suitable for your application.
- Number of Channels: Relay modules can have single or multiple channels, allowing you to control multiple devices independently.
- Opto-Isolation: Many relay modules include opto-isolation, providing electrical isolation between the control circuit and the load.
Features
- High-Power Switching: The Relay Module enables the control of high-power devices, such as lights, motors, or appliances, using low-power signals.
- Electrical Isolation: The opto-isolation feature ensures the safety of the control circuit by preventing direct contact with the high-power load.
Circuit Diagram
The following circuit shows you How to Interface 2 Channel Relay Module with Arduino, Please make the connection carefully

Working Explanation:
In this tutorial example, we will demonstrate how to use the Relay Module to control the illumination of a bulb based on ambient light levels detected by an LDR sensor. When the LDR detects low light (indicating darkness), the Relay Module will activate the bulb, providing artificial light. Conversely, when the LDR detects high light (indicating brightness), the Relay Module will deactivate the bulb, conserving energy. This example showcases the practical application of the Relay Module in creating an energy-efficient lighting system.
Installing Arduino IDE Software
First, you will require to Download the updated version of Arduino IDE Software and Install it on your PC or laptop. if you Learn How to install the Arduino step-by-step guide then click on how to install Arduino Button given Blow
Code
//For more Projects: www.arduinocircuit.com

int sensorPin = A0;
int relayPin = 9;

void setup()
{
  Serial.begin(9600);
  pinMode(sensorPin, INPUT);
  pinMode(relayPin, OUTPUT);
}
void loop()
{
  int sensorValue = analogRead(sensorPin);
  if( sensorValue <= 500 )  // Change the value as per your requirement
  {
    digitalWrite(relayPin, LOW);
    Serial.print("LED ON ");
    Serial.println(sensorValue);
    delay(100);
  }

  else
  {
    digitalWrite(relayPin, HIGH);
    Serial.print("LED OFF");
    Serial.println(sensorValue);
  }
}
Applications
- Home Automation: Relay modules are integral to home automation projects, enabling remote control of lights, fans, and other appliances.
- Industrial Control: In industrial settings, relay modules use to control machinery, pumps, and motors.
- Security Systems: Relay modules play a role in security systems, activating alarms or cameras in response to sensor inputs.
- Energy Efficiency: They uses to control energy-consuming devices based on environmental conditions, optimizing energy usage.
Conclusion
You have now acquired a comprehensive understanding of the Relay Module and its applications in high-power device control. By interfacing the Relay Module with Arduino UNO, you can build projects that enable remote control of appliances and devices with ease. The module’s high-power switching capability and opto-isolation make it a valuable component in home automation, industrial control, and energy-efficient systems.


