
Introduction
In this tutorial, we will explore the concept of Operating on Debounce / Interrupts on Switch with MCU, debouncing and interrupts when working with a switch and a microcontroller unit (MCU). Switches are commonly used as input devices in electronic projects, and they can generate unstable or noisy signals due to mechanical issues. Debouncing is the process of removing the unintended multiple transitions generated when a switch is pressed or released. Interrupts, on the other hand, allow the MCU to respond to external events while executing other tasks. We will use an Arduino UNO board and a KY-004 Key Switch Module to demonstrate the implementation of debouncing and interrupts.
Hardware Required
You will require the following Hardware Components for Operating on Debounce / Interrupts on Switch with MCU
| Components | # | Buy From Amazon |
|---|---|---|
| Arduino UNO | 1 | Buy Now |
| KY-004 Key Switch Module | 1 | Buy Now |
| 5mm LED | 1 | Buy Now |
| Resistor 10KΩ | 1 | Buy Now |
| Jumper Wires | 3 | Buy Now |
| Breadboard | 1 | Buy Now |

Specifications
This module contains a 10kΩ resistor, an FZ1713 tactile push button, and 3 male header pins.
| Rating | 50mA 12VC |
| Environment temperature | -25°C to 105°C [ -13°F to 221°F] |
| Durability | 100,000 cycles |
| Operating Force | 180/230(±20gf) |
| Board Dimensions | 18.5mm x 15mm [0.728in x 0.591in] |
Pinout

Pin Configuration
| Pin Name | Pin Type |
|---|---|
| S | Signal Pin |
| middle Pin | Vcc (+5) |
| ( – ) | Ground |
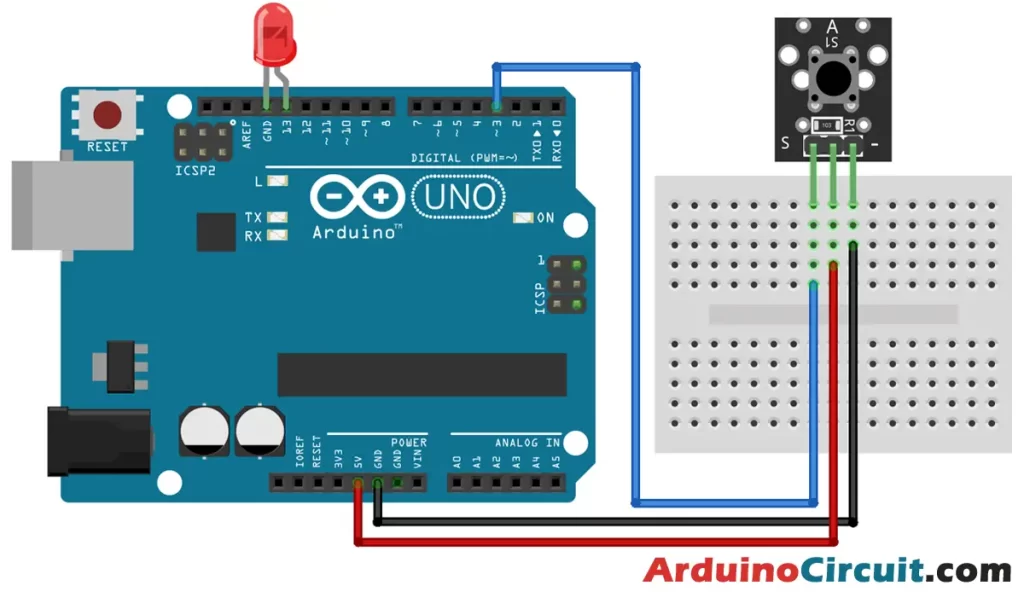
Circuit Diagram
Installing Arduino IDE Software
First, you will require to Download the updated version of Arduino IDE Software and Install it on your PC or laptop. if you Learn How to install the Arduino step-by-step guide then click on how to install Arduino Button given Blow
Code
//For more Projects: www.arduinocircuit.com

int LedOutput = 13;// Define as LED Output Pin 13 you can add resistor with led
int SensorPin = 3; // Define as Sensor Pin Input
int Value;// Define as variable
void setup()
{
pinMode(LedOutput,OUTPUT);//Set as LED output
pinMode(SensorPin,INPUT);//Set as photo interrupter sensor output interface
}
void loop()
{
Value=digitalRead(SensorPin);// Set as sensor read SensorPin
if(Value==HIGH) //If value is equal to HIGH estate then turn LED output = high
{
digitalWrite(LedOutput,HIGH); // Set ledoutput to HIGH or ON
}
else
{
digitalWrite(LedOutput,LOW); // Set landoutput to LOW or OFF
}
}
Code 2
The code below will demonstrate how to use debounce on the Arduino microcontroller using a push button. When the button is pressed it will stay HIGH State if pressed again it will stay at LOW State.
//For more Projects: www.arduinocircuit.com

int inPin = 3;
int outPin = 13;
int state = HIGH;
int reading;
int previous = LOW;
long time = 0;
long debounce = 200;

void setup(){

	pinMode(inPin, INPUT);
    pinMode(outPin, OUTPUT);
}

void loop(){
	switchOn();
}

void switchOn(){
	reading = digitalRead(inPin);
	if (reading == 1 && Previous == 0 && millis() - time > debounce){
		if (state == 1)
			 state = 0;
		 else
			 state = 1;
			time = millis();
	}
		digitalWrite(outPin, state);
		previous = reading;
}
Applications
- User Input: Debouncing allows for reliable detection of user input through switches, ensuring accurate and responsive interaction with the device or system.
- Control Systems: Debounced switches with interrupts can be used to control various systems, such as turning on/off lights, controlling motors, or adjusting settings.
- Robotics: In robotics projects, debouncing and interrupts help detect switch inputs for controlling robot movements, activating sensors, or triggering specific actions.
- Automation: Debounced switches are commonly used in home automation projects to control appliances, security systems, or environmental settings.
- Gaming: Debounced switches with interrupts enable precise and responsive input for gaming applications, such as controlling characters or triggering in-game actions.
- Industrial Systems: Debouncing and interrupts play a crucial role in industrial systems for switch-based control and monitoring tasks, ensuring reliable and accurate operations.
Conclusion
In this tutorial, we learned about debouncing and interrupts when working with a switch and an MCU. We discussed the purpose of debouncing to remove unintended switch transitions and ensure reliable readings. Additionally, we explored the concept of interrupts, allowing the MCU to respond to external events while executing other tasks. By using an Arduino UNO board and a KY-004 Key Switch Module, we demonstrated how to implement debouncing and interrupts in a practical circuit. You can now apply these concepts to your own projects and enhance the reliability and responsiveness of switch inputs in your MCU-based systems.


