
Introduction
In this Arduino Project, we are going to learn to Measure Any AC Current using ACS712 with Arduino. In the world of electronics and Arduino projects, measuring AC current accurately is often a crucial requirement. Luckily, with the help of the ACS712 Current Sensor Module and Arduino Nano, this task becomes a breeze. In this article, we will explore how to effectively measure any AC current using the ACS712 sensor module in conjunction with an Arduino Nano. So, gather your components, follow along, and let’s dive into the world of current sensing!
Hardware Required
You will require the following Hardware Components to Measure Any AC Current using ACS712 with Arduino.
| Components | # | Buy From Amazon |
|---|---|---|
| Arduino Nano | 1 | Buy Now |
| ACS712 Current Sensor Module | 1 | Buy Now |
| 9v DC Adapter (Optional) | 1 | Buy Now |
| Jumper Wires | 3 | Buy Now |
| Breadboard | 1 | Buy Now |
What is the Module?
The ACS712 Current Sensor Module is a compact and reliable sensor that allows us to measure both AC and DC currents with ease. It operates on the principle of Hall effect, where a magnetic field generated by the current flowing through a conductor is sensed and converted into a voltage proportional to the current.
Pinout
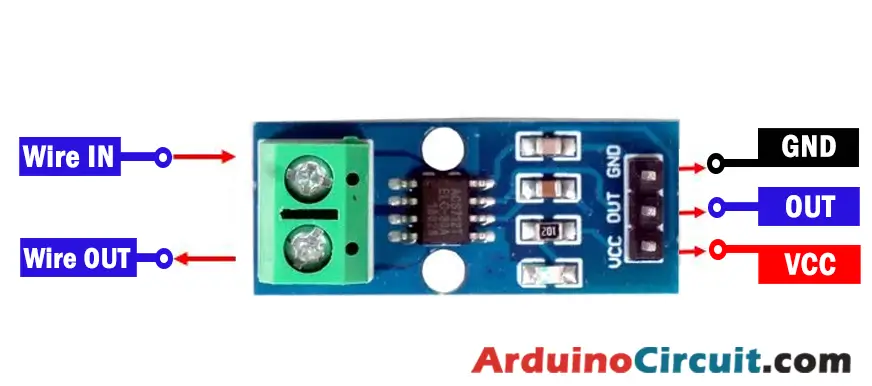
Pin Configuration
| Pin Name | Description |
| Vcc | Input voltage is +5V for typical applications |
| Output | Outputs Analog voltage proportional to current |
| Ground | Connected to ground of circuit |
| Wire In | The wire through current has to be measured is connected here |
| Wire Out | The wire through current has to be measured is connected here |
Specifications of ACS712 Current Sensor
- Sensing Range: The ACS712 module comes in different variations, each with its own sensing range. It typically ranges from 5A to 30A, allowing you to choose the module that suits your specific current measurement requirements.
- Sensitivity: The sensitivity of the ACS712 module determines the output voltage change per unit change in current. It is typically 185 mV/A, meaning that for every ampere of current flowing through the sensor, the output voltage will change by 185 millivolts.
- Supply Voltage: The module operates on a supply voltage of 5V, making it compatible with Arduino boards and other microcontrollers.
- Noise Immunity: The ACS712 module is designed to be immune to noise and external interference, ensuring accurate and reliable current measurements.
- Response Time: With a fast response time, the ACS712 module can capture rapid changes in current, making it suitable for dynamic current measurements.
Features of ACS712 Current Sensor
- Non-Invasive: The ACS712 module is a non-invasive current sensor, meaning that it does not require the interruption or modification of the existing circuit for current measurement. This makes it a convenient and safe option for various applications.
- High Accuracy: With its precision and sensitivity, the ACS712 module provides accurate current measurements, allowing you to monitor and analyze current consumption in your projects or systems effectively.
- Easy to Interface: The ACS712 module can be easily connected to Arduino boards and other microcontrollers using simple jumper wires. Its output voltage can be read and processed by the Arduino to obtain the current measurements.
- Compact and Versatile: The small form factor of the ACS712 module makes it suitable for integration into compact projects and systems. Its versatility allows it to be used in a wide range of applications, from power monitoring to motor control.
- Overcurrent Protection: The ACS712 module incorporates built-in overcurrent protection, safeguarding your circuit and sensor from excessive current, which can be especially useful in industrial and high-power applications.
Circuit Diagram
The following circuit shows you the connection of the Measure Any AC Current using ACS712 with Arduino Please make the connection carefully

Working Explanation
To measure AC current using the ACS712 Current Sensor Module and Arduino Nano, follow these steps:
- Connect the ACS712 module to the Arduino Nano using jumper wires. Ensure the power supply is disconnected during the connections.
- Connect the VCC and GND pins of the ACS712 module to the 5V and GND pins of the Arduino Nano, respectively.
- Connect the output pin of the ACS712 module to any analog input pin of the Arduino Nano.
- Provide the necessary power supply to the ACS712 module and the Arduino Nano.
- Upload the Arduino code that reads the analog input and converts it into current values using the sensitivity of the ACS712 module.
- Once the code is uploaded, reconnect the power supply and observe the current measurements displayed on the Arduino’s serial monitor.
Installing Arduino IDE Software
First, you will require to Download the updated version of Arduino IDE Software and Install it on your PC or laptop. if you Learn How to install the Arduino step-by-step guide then click on how to install Arduino Button given Blow
Installing Libraries
Now when you are Ready to upload the code, to the Arduino Board you will need first to add the Following Libraries in Arduino, If you Learn How to add the library in the Arduino step-by-step guide click on how to install the library Button given Blow
Code
//For more Projects: www.arduinocircuit.com

#include <Filters.h>

float testFrequency = 60; // test signal frequency (Hz)
float windowLength = 20.0/testFrequency; // how long to average the signal, for statistist
int sensorValue = 0;
float intercept = -0.1129; // to be adjusted based on calibration testing
float slope = 0.0405; // to be adjusted based on calibration testing
float current_amps; // estimated actual current in amps

unsigned long printPeriod = 100; // in milliseconds
// Track time in milliseconds since last reading
unsigned long previousMillis = 0;

void setup() {
Serial.begin( 9600 ); // start the serial port
}

void loop() {
RunningStatistics inputStats; // create statistics to look at the raw test signal
inputStats.setWindowSecs( windowLength );

while( true ) {
sensorValue = analogRead(A0);
inputStats.input(sensorValue);
if((unsigned long)(millis() – previousMillis) >= printPeriod) {
previousMillis = millis(); // update time

Serial.print(“\n” );
Serial.print( “\tsigma: ” );
Serial.print( inputStats.sigma() );
current_amps = intercept + slope * inputStats.sigma();
Serial.print( “\tamps: ” );
Serial.println( current_amps );

}
}
}
Applications
- Power Monitoring: The ACS712 module can be used in energy monitoring systems to measure AC current consumption and track power usage in residential, commercial, or industrial settings.
- Home Automation: It can be employed in home automation projects to monitor the power consumption of specific appliances or to trigger actions based on current thresholds.
- Motor Control: The ACS712 module enables precise current sensing in motor control applications, ensuring efficient operation and protection against overcurrent conditions.
- Industrial Equipment: In industrial machinery and equipment, the ACS712 module can monitor and control current levels to prevent damage, optimize performance, and ensure operational safety.
- Smart Grids: The module can be utilized in smart grid systems to measure current flow in power distribution networks, enabling effective load management and fault detection.
Conclusion
The ACS712 Module, when paired with an Arduino Nano, allows for precise AC current measurement in diverse projects and applications. Its simplicity, reliability, and features make it an invaluable tool for monitoring, control, and protection tasks. Tap into your creativity, leverage the ACS712 module’s capabilities, and delve into the fascinating world of current sensing in your Arduino projects!


