
Introduction
Hi, today we will learn to LED Brightness Control using Potentiometer with Arduino, A Potentiometer another resistor that allows us to change its value by turning a small pin placed on it, the analog value read by Arduino will allow us to make our LED flash depending on the value read.
Potentiometers are also used in displays and monitors to adjust the brightness and contrast of the image. This is achieved by varying the voltage supplied to the display, which in turn controls the brightness and contrast of the pixels.
Hardware Required
| Components | # | Buy From Amazon |
|---|---|---|
| Arduino UNO | 1 | Buy Link |
| LED 5mm | 1 | Buy Link |
| Potentiometer 10KΩ | 1 | Buy Link |
| Resistor 220Ω | 1 | Buy Link |
| Jumper Wires | – | Buy Link |
| Breadboard | 1 | Buy Link |
What is Potentiometer?
A potentiometer is an electrical component that consists of a resistive element and a wiper that moves along it, allowing the user to vary the resistance between the two end terminals. Potentiometers control the flow of electric current in a circuit by varying the resistance.
Potentiometers are widely used in many electronic and electrical circuits as variable resistors. They are used for various applications such as controlling the intensity of light in a lamp, adjusting the temperature in a heater, controlling the speed of a motor, and many more.
One of the most common applications of a potentiometer is in audio equipment, which is used to control the volume and tone of the sound. In a guitar, a potentiometer is used to manage the volume of the output signal, and another one is used to control the tone by adjusting the frequency response of the signal.
Pinout of Potentiometer

Pin Configuration
| Pin Name | Pin Type |
|---|---|
| VCC | +5v or VCC |
| Out Put | Output used For Signal |
| GND | Ground Pin |
Circuit Diagram
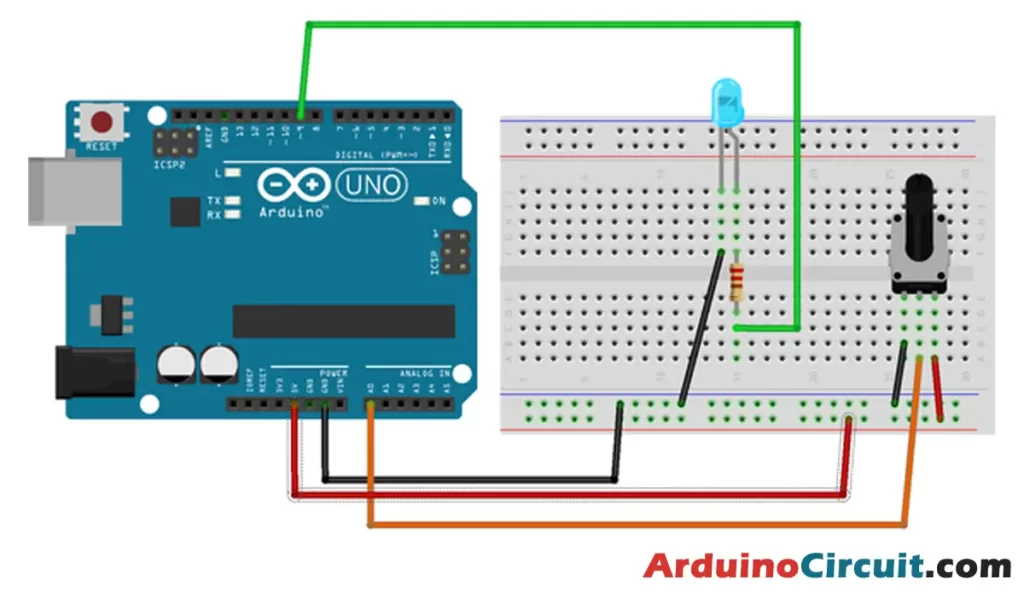
Circuit Connection
Place the LED on the BreadBoard and connect the power line pin -ve of the LED to the GND pin of the Arduino and connect the 1-pin of 220Ω Resistors to 9 pin of the Arduino respectively. and the 2-pin of Resistor is connected to the +ve of the LED
Connect the central leg of the potentiometer to pin A0, Connect one to the GND and the other to the 5V pin to the other two external legs. This does not affect the operation of the potentiometer.
| Arduino | Potentiometer | LED |
|---|---|---|
| 9 Pin | +Ve with R2 | |
| A0 | Output | |
| 5v | VCC | |
| GND | GND | -Ve |
Installing Arduino IDE Software
First, you will require to Download the updated version of Arduino IDE Software and Install it on your PC or laptop. if you Learn How to install the Arduino step-by-step guide then click on how to install Arduino Button given Blow
Code
The following code for the LED Brightness Control using Potentiometer with Arduino.
//Arduino Led and potentiometer, We make a led flash according to the value given by the potentiometer
//For more info Visits: www.arduinocircuit.com

int Ledpin = 9; //The pin to which the led is connected

void setup() {
pinMode(Ledpin, OUTPUT); //The pin is outgoing
}

void loop() {
digitalWrite(Ledpin, HIGH); //The LED is on
delay(analogRead(0)); // Wait for the value read from analog pin 0
digitalWrite(Ledpin, LOW); //Turn off the led
delay(analogRead(0)); //Wait again for the time read from analog pin 0
}
Applications
Some common applications of potentiometers include:
- Volume and tone controls in audio equipment such as amplifiers and mixers
- Brightness and contrast controls in displays and monitors
- Control of motor speed in machines and robotics
- Measurement of physical quantities such as temperature and pressure
- Calibration of electronic instruments and sensors.


