Introduction
Upgrade your home automation system with the IR Remote Control Light Switch using TSOP4838 IR receiver module. In this tutorial, we’ll guide you through creating a wireless light control system with the Arduino Nano and various electronic components. By incorporating the TSOP4838 IR receiver, you can control AC bulbs wirelessly using a standard infrared remote control. This project combines Arduino programming with the convenience of remote control for a modern and efficient lighting solution. Let’s explore the necessary components and the step-by-step process to create this IR remote-controlled light switch.
Hardware Required
You will require the following Hardware Components for IR Remote Control Light Switch using TSOP4838.
| Components | # | Buy From Amazon |
|---|---|---|
| Arduino Nano | 1 | Buy Now |
| TSOP4838 IC | 1 | Buy Now |
| MOC3011 IC | 3 | Buy Now |
| Transistor BT136 | 3 | Buy Now |
| AC Bulb light | 3 | Buy Now |
| Resistor 1KΩ | 3 | Buy Now |
| Jumper Wires | Few | Buy Now |
| Breadboard | 1 | Buy Now |
TSOP38238 Pinout
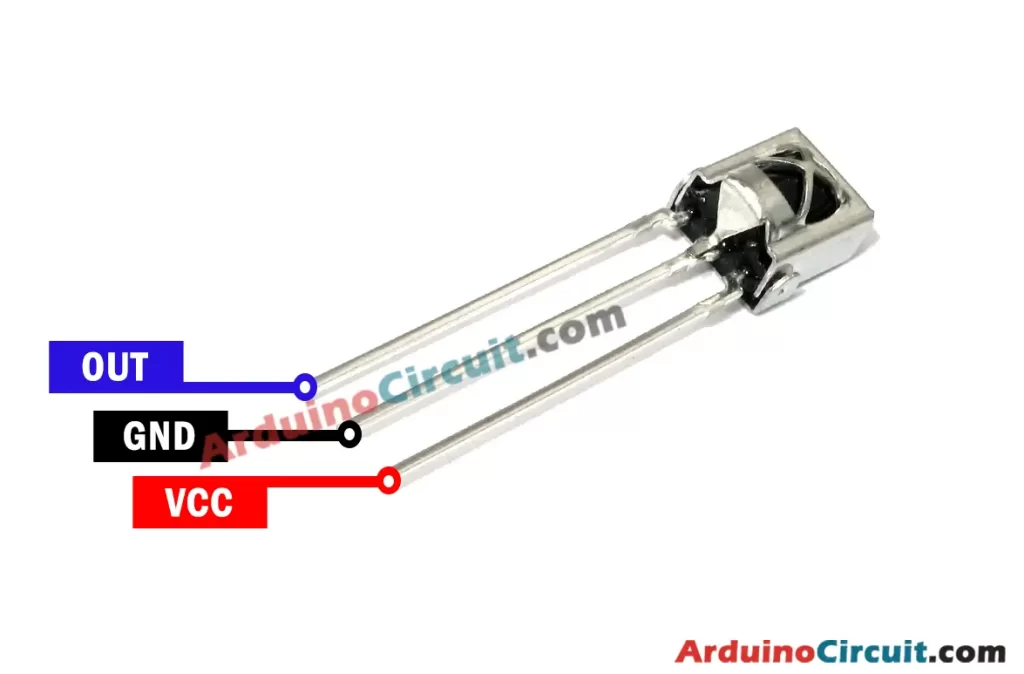
TSOP38238 Pinout Configuration
| Pin Name | Description |
| VCC | The Vcc pin powers the module, typically with +5V |
| GND | Power Supply Ground |
| OUT | Output Pin |
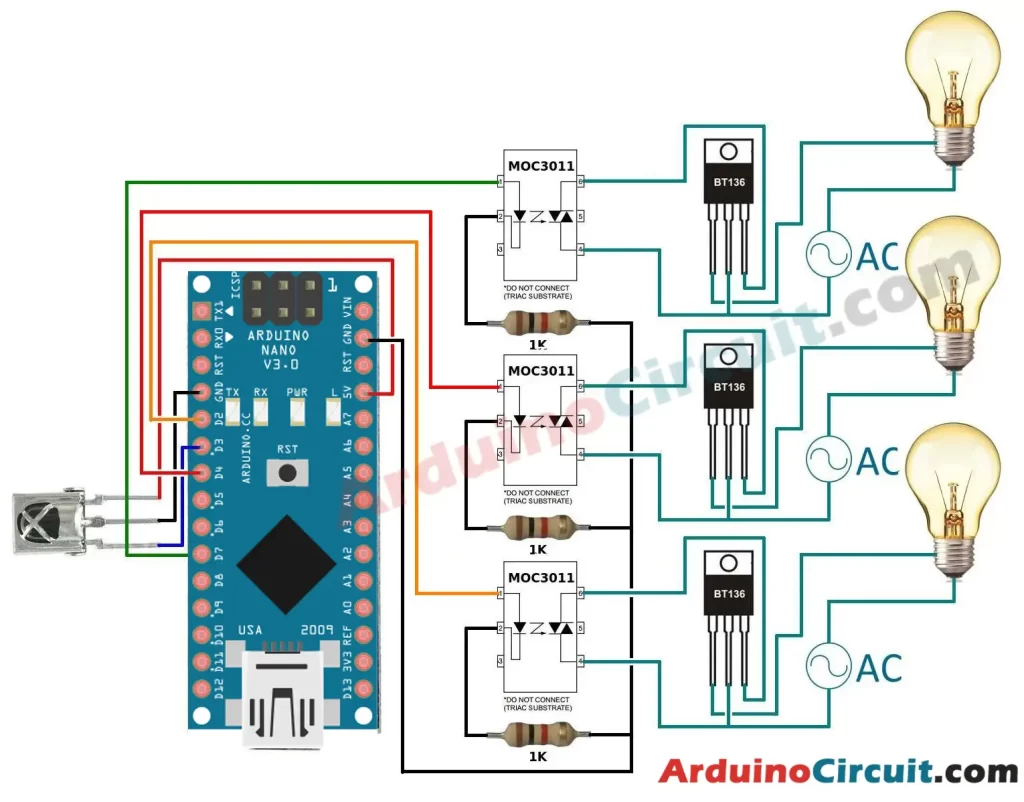
Creating the IR Remote Control Light Switch
Follow these steps to create the IR Remote Control Light Switch:
- Connect the cathode (short leg) of each LED to a separate digital pin on the Arduino Nano (e.g., pins 2, 4, and 7).
- Connect the anode (long leg) of each LED to a 220Ω resistor. Connect the other end of each resistor to the 5V rail on the breadboard.
- Connect the common ground (GND) of all components, including the LED cathodes and the TSOP4838 IR receiver, to the GND rail on the breadboard.
- Connect the output pin of the TSOP4838 IR receiver to digital pin 3 on the Arduino Nano.
Circuit Diagram
The following circuit shows you the connection of the IR Remote Control Light Switch using TSOP4838 Please make the connection carefully
Installing Arduino IDE Software
First, you will require to Download the updated version of Arduino IDE Software and Install it on your PC or laptop. if you Learn How to install the Arduino step-by-step guide then click on how to install Arduino Button given Blow
Installing Libraries
Now when you are Ready to upload the code, to the Arduino Board you will need first to add the Following Libraries in Arduino, If you Learn How to add the library in the Arduino step-by-step guide click on how to install the library Button given Blow
Code
//For more Projects: www.arduinocircuit.com

#include <IRremote.h>

int RECV_PIN = 3; // the pin where you connect the output pin of TSOP4838

int led1 = 2;
int led2 = 4;
int led3 = 7;

IRrecv irrecv(RECV_PIN);
decode_results results;

void setup() {
  irrecv.enableIRIn();
  pinMode(led1, OUTPUT);
  pinMode(led2, OUTPUT);
  pinMode(led3, OUTPUT);

  // Initialize LEDs OFF
  digitalWrite(led1, LOW);
  digitalWrite(led2, LOW);
  digitalWrite(led3, LOW);
}

void loop() {
  if (irrecv.decode(&results)) {
    unsigned long value = results.value;
    switch (value) {
      case 552656927: // Code received from button A
        toggleLED(led1);
        break;
      case 552600317: // Code received from button B
        toggleLED(led2);
        break;
      case 552624287: // Code received from button C
        toggleLED(led3);
        break;
    }
    irrecv.resume();
  }
}

void toggleLED(int led) {
  digitalWrite(led, !digitalRead(led)); // Toggle the state of the specified LED
}
Using the IR Remote
The provided Arduino code reads IR signals from the remote control and switches the AC bulbs accordingly. You can customize the code to map different remote control buttons to control each bulb individually. Upload the code to your Arduino Nano and test the system using the remote control.
Applications
- Home Automation: Effortlessly control the lighting in various rooms using a single remote control.
- Energy Savings: Turn off bulbs remotely to save energy when not needed.
- Convenience: Control multiple lights from a distance, perfect for bedrooms, living rooms, or hallways.
- Home Theater Setup: Use the IR remote to create a comfortable ambiance for movie nights.
- Accessibility: Provide easy light control for individuals with mobility challenges.
Conclusion
In this tutorial, we explored how to create an IR Remote Control Light Switch using the TSOP4838 IR receiver module and Arduino Nano. By combining these components, we developed a wireless system to control AC bulbs using a standard infrared remote control. We discussed the necessary components, the circuit connections, and provided a sample Arduino code to enable remote-controlled light switching. Now you have the knowledge to create your own IR remote-controlled light switch, enhancing the convenience and efficiency of your home lighting system.