
Introduction
In this tutorial, we are Interfacing Led and LDR photoresistor with Arduino, Today we will use the first sensor: the photoresistor. The photoresistor is a resistor that varies its value based on the light and for this reason, it can be used with Arduino to create innovative and more complex projects.
What is a Twilight photoresistor?
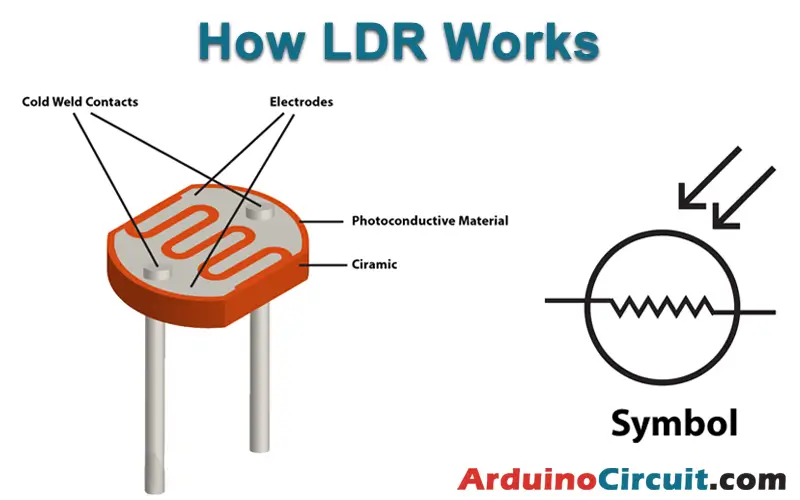
A twilight photoresistor, also known as a light-dependent resistor (LDR), is a type of resistor that changes its resistance based on the amount of light that it receives. This type of resistor is unique in that it allows for the sensing of light levels and the control of electronic circuits based on those levels.
In its simplest form, a twilight photoresistor consists of a resistor with a light-sensitive material, such as cadmium sulfide, that changes its resistance when exposed to light. The resistance of the photoresistor decreases as the light level increases, and vice versa. By measuring the resistance of the photoresistor, an electronic circuit can determine the light level and adjust its behavior accordingly.
Hardware Required
You will need the following components for Interfacing Led and LDR photoresistor with Arduino
| Components | # | Buy From Amazon |
|---|---|---|
| Arduino UNO | 1 | Buy Link |
| LED 5mm | 1 | Buy Link |
| Photoresistor | 1 | Buy Link |
| Resistor 220Ω | 1 | Buy Link |
| Resistor 100KΩ | 1 | Buy Link |
| Jumper Wires | 7 | Buy Link |
| Breadboard | 1 | Buy Link |
Circuit Diagram
Circuit Connection
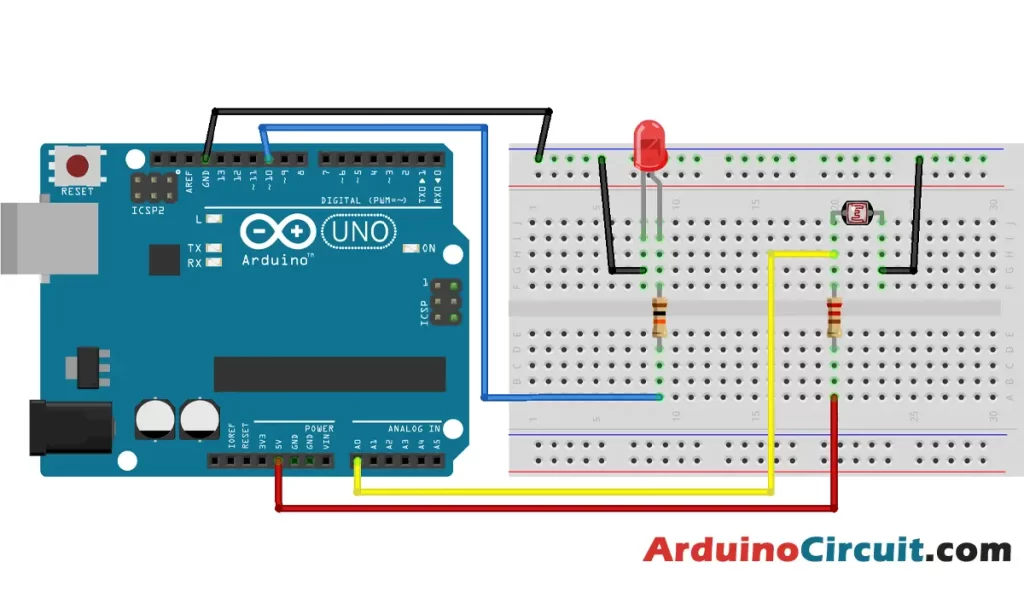
Place the LED on the BreadBoard and connect the power line pin -ve of the LED to the GND pin of the arduino and connect the 1-pin of 220Ω Resistors to 10 pin of the Arduino respectively. and the 2-pin of Resistor is connected to the +ve of the LED
Connect a 100kΩ resistor to the 5V pin of the Arduino and to it the photoresistor and a cable that leads to pin A0. Connect the Arduino GND pin to the other leg of the photoresistor.
| Arduino | LDR | LED |
|---|---|---|
| 10 Pin | +Ve with R2 | |
| A0 | Pin-1 | |
| 5v | Pin-1 with R1 | |
| GND | Pin-2 | -Ve |
Installing Arduino IDE Software
First, you will require to Download the updated version of Arduino IDE Software and Install it on your PC or laptop. if you Learn How to install the Arduino step-by-step guide then click on how to install Arduino Button given Blow
Code
// Arduino led and photoresistor, We turn on a led when the photoresistor is in the dark
// For more info: www.ArduinoCircuit.com

int brightness; //The value read by the photoresistor
int ledPin = 10; //The pin of the led
void setup() {
}
void loop() {
  brightness = analogRead(A0); //Read brightness
  brightness = brightness/4; //We adjust the brightness value
  analogWrite(ledPin,brightness); //We put the value read for the led
  delay(10); //Wait 10ms
}
Applications
- The twilight photoresistors is in lighting control systems. By connecting the photoresistor to an electronic circuit, it is possible to control the brightness of light based on the ambient light level. For example, in a room with a large window, the photoresistor can be used to automatically adjust the brightness of the lights as the sun rises and sets, providing a natural and energy-efficient lighting experience.
- The twilight photoresistors is in outdoor lighting systems. By connecting the photoresistor to a timer, it is possible to turn lights on at dusk and turn them off at dawn, providing a convenient and energy-efficient lighting solution for outdoor areas.
- The twilight photoresistor is a unique and versatile component that provides a convenient way to sense and control lighting based on the ambient light level. Its wide range of applications and simple implementation makes it an essential tool for engineers, hobbyists, and designers alike.


