
Introduction
In this tutorial, we will learn how to use an active buzzer with an Arduino. An active buzzer is a device that can generate an audio signal when powered. It is called “active” because it has internal components that generate the electrical signal with audible frequencies. The signal that controls it can be digital. By following the steps outlined in this tutorial, you can generate various types of sounds and tones using the active buzzer.
In this way, an active buzzer is a digital output component, that is, its operation consists of generating an audible wave when being powered. In this example, we will connect the signal pin of our passive buzzer to digital pin #9 of the card.
Hardware Required
You will require the following Hardware Components for How to Use Active Buzzer with Arduino Tutorial.
| Components | # | Buy From Amazon |
|---|---|---|
| Arduino UNO | 1 | Buy Link |
| Active Buzzer | 1 | Buy Link |
| Jumper Wires | – | Buy Link |
| Breadboard | 1 | Buy Link |
What is Active Buzzer?
An active buzzer is a type of electronic buzzer that has an internal oscillator circuit. It generates a continuous sound when a DC voltage is applied to its terminals. Active buzzers are different from passive buzzers in that they require an external source of power to operate. They can be driven directly by a microcontroller, such as an Arduino board.
An active buzzer is an electronic component that generates a continuous sound when it is powered on. It is widely used in alarms, timers, and other electronic projects where an audible signal is needed. In this tutorial, we will learn how to use an active buzzer with an Arduino board.
Specifications
- Operating Voltage: 3.3V to 5V
- Resonant Frequency: 2300Hz +/- 300Hz
- Sound Pressure Level: 85dB @ 10cm
- Current Consumption: 30mA
Features
- Small size and lightweight
- Low power consumption
- Easy to use and interface with microcontrollers
- Generates a loud and clear sound
Pinout

Pin Configuration
| Pin Name | Pin Type |
|---|---|
| Positive | Positive supply Pin |
| Negative | Negative supply Pin |
Circuit Diagram
The following circuit shows you the connection of Active Buzzer with Arduino Tutorial Please make the connection carefully
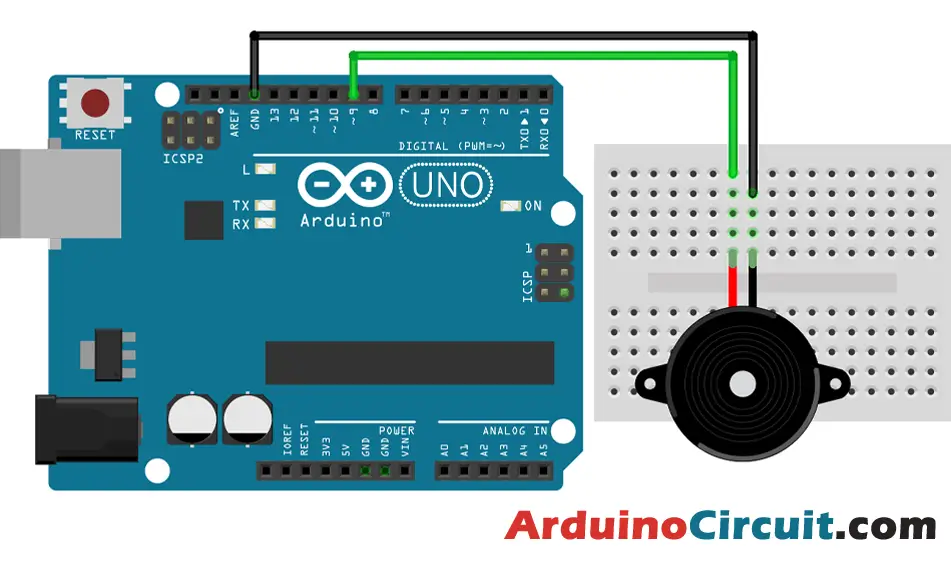
Circuit Connections
| Arduino | Buzzer |
|---|---|
| Pin 9 | Positive |
| GND | Negative |
Installing Arduino IDE Software
First, you will require to Download the updated version of Arduino IDE Software and Install it on your PC or laptop. if you Learn How to install the Arduino step-by-step guide then click on how to install Arduino Button given Blow
How to Use an Active Buzzer with Arduino
Step 1: Connect the positive (+) terminal of the active buzzer to a digital pin of the Arduino board. Connect the negative (-) terminal to the ground (GND) pin of the board.
Step 2: Open the Arduino IDE and create a new sketch.
Step 3: Define the digital pin to which the positive terminal of the active buzzer is connected using the pinMode() function. Set the pin mode to OUTPUT.
Step 4: In the loop() function, use the digitalWrite() function to turn the buzzer on and off at a specific frequency to generate a sound. For example, to generate a beep every 500ms, use the following code:
digitalWrite(buzzerPin, HIGH); delay(250); digitalWrite(buzzerPin, LOW); delay(250);
Step 5: Upload the sketch to the Arduino board and run it.
Code
We upload the code to the Arduino Uno card and listen as the buzzer emits sound for one second and remains silent for 4 seconds, cyclically.
//For more Projects: www.arduinocircuit.com

const int pinBuzzer = 9; //Constant that contains the number of the Arduino pin to which we connect an active buzzer

void setup()
{
  pinMode(pinBuzzer, OUTPUT);
}

void loop()
{
  digitalWrite(pinBuzzer, HIGH); // Set the buzzer pin high (5V)
  delay(1000); // Wait 1 second
  digitalWrite(pinBuzzer, LOW); // Set the buzzer pin low (0V)
  delay(4000); // wait 4 seconds
}
Applications
- Alarm systems
- Timers and clocks
- Electronic toys and games
- Warning signals in vehicles and machinery
Conclusion
Using an active buzzer with an Arduino board is a simple and easy process. By following the steps summarized in this tutorial, you can generate different types of sounds and tones using the active buzzer. Its small size, low power consumption, and clear sound make it a popular choice for a wide range of electronic projects.


