
Introduction
The MAX7219 is a popular integrated circuit that allows you to control multiple LED dot matrix displays using just a few pins from a microcontroller like Arduino. This tutorial will guide you through the process of How to Interfacing MAX7219 LED Dot Matrix Display with Arduino, enabling you to display text, numbers, and even simple animations on the LED dot matrix display.
Hardware Required
You will require the following Hardware Components Interfacing MAX7219 LED Dot Matrix Display with Arduino.
| Components | # | Buy From Amazon |
|---|---|---|
| Arduino UNO | 1 | Buy Link |
| MAX7219 LED Dot Matrix Display Module | 1 | Buy Link |
| 9v DC Adapter (Optional) | 1 | Buy Link |
| Jumper Wires | 5 | Buy Link |
| Breadboard | 1 | Buy Link |
What is the Dot Matrix Display Module?
At its essence, the MAX7219 is a compact and efficient display driver that empowers your Arduino projects to showcase scrolling text, dynamic patterns, and even simple graphics. Picture it as a canvas waiting to illuminate your ideas. But what makes it more than just a display?
Pinout
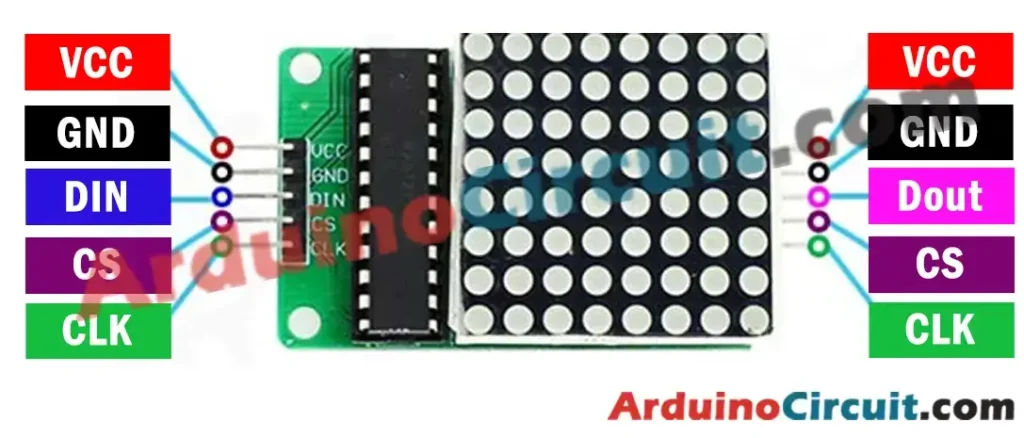
Pin Configuration
| Pin Type | Pin Description |
| Vcc | 5V Input Voltage |
| GND | Ground |
| CS | Chip Select |
| CLK | Clock |
| DIN | Data-In |
| DOUT | Data Out (Use for Multiple Display Interfacing) |
Note: Both sides contain VCC, GND, CS, CLK pins.
Specifications
- Cascadable: Connect multiple MAX7219 modules seamlessly, creating larger and more intricate displays.
- LED Brightness Control: Adjust the brightness to fit your environment or project requirements.
- Simple Serial Interface: Communicate with the module using a straightforward serial protocol, simplifying integration.
- Low Power Consumption: Despite its luminous capabilities, the MAX7219 is energy-efficient, crucial for projects running on limited power.
- Versatile Display: With a resolution of 8×8, each module can exhibit characters, symbols, or graphics with clarity.
Features
- Easy Integration: Its user-friendly design ensures quick and hassle-free integration into your Arduino projects.
- Scalability: The ability to cascade multiple modules allows for the creation of larger and more dynamic displays.
- Saves Pins: The MAX7219 requires only three pins from your Arduino, freeing up resources for other components.
- Text Scrolling: Craft dynamic displays by making text scroll smoothly across the matrix.
- Reliability: Known for its stability and dependability, the MAX7219 ensures consistent performance even in demanding applications.
Circuit Diagram
The following circuit shows you the connection of the How to Interfacing MAX7219 LED Dot Matrix Display with Arduino. Please make the connection carefully

Circuit Connections
| Arduino | MAX7219 Module |
|---|---|
| +5V | VCC Pin |
| GND | GND Pin |
| D10 | CS |
| D11 | Din |
| D12 | CLK |
Installing Arduino IDE Software
First, you will require to Download the updated version of Arduino IDE Software and Install it on your PC or laptop. if you Learn How to install the Arduino step-by-step guide then click on how to install Arduino Button given Blow
Installing Libraries
Now when you are Ready to upload the code, to the Arduino Board you will need first to add the Following Libraries in Arduino, If you Learn How to add the library in the Arduino step-by-step guide click on how to install the library Button given Blow
Code
//For more Projects: www.arduinocircuit.com

#include "LedControlMS.h"

 //pin 12 is connected to the DataIn
// pin 11 is connected to the CLK
 //pin 10 is connected to LOAD

#define NBR_MTX 1 //number of matrices attached is one
LedControl lc=LedControl(12,11, 10, NBR_MTX);//

void setup()
{
  for (int i=0; i< NBR_MTX; i++)
  {
    lc.shutdown(i,false);
  /* Set the brightness to a medium values */
    lc.setIntensity(i,8);
  /* and clear the display */
    lc.clearDisplay(i);
                delay(500);
  }
}

void loop()

{
     lc.writeString(0,"ARDUINOCIRCUIT");//sending characters to display
     lc.clearAll();//clearing the display
     delay(1000);
}
Applications
- Digital Clocks: Build your own digital clock with customizable fonts and styles.
- Message Boards: Create interactive message boards that can display information or welcome messages.
- Gaming Displays: Craft simple games with sprites and characters on the LED matrix.
- Weather Stations: Showcase real-time weather updates using icons and animations.
- Countdown Timers: Develop countdown timers for events or projects, adding a visual element to the anticipation.
Conclusion
In the symphony of Arduino components, the MAX7219 LED Dot Matrix Display emerges as a maestro, orchestrating visual brilliance. Its cascading capabilities, simple integration, and versatile applications make it a must-have for anyone exploring the world of microcontroller projects.


