Introduction
In this project you will learn 16×2 LCD Display Interfacing with Arduino Uno Liquid Crystal Display (LCD) is now being utilized in any electronics field whether it is operating in analog or digital. To understand how LCD operates with Arduino, one thing you should know is the basics of LCD. Normally used LCD has 8 bits.
There are built-in functions in Arduino software for the LCD to display some data on the LCD, to move data, and to clear data. The 16×2 LCD module interfacing with Arduino Uno is very easy, here you will learn how to interface 16×2 LCD with the Arduino Uno.
To interface with a 16×2 LCD, a microcontroller or other embedded system typically uses a parallel interface with 8 data lines and several control lines. The control lines include signals for enabling the display, setting the cursor position, and reading or writing data to the display.
Hardware Required
You will require the following Hardware Components for interfacing the 16×2 LCD Display with Arduino.
| Components | # | Buy From Amazon |
|---|---|---|
| Arduino UNO | 1 | Buy Now |
| 16×2 LCD Display | 1 | Buy Now |
| Potentiometer 10KΩ | 1 | Buy Now |
| Resistor 220Ω | 1 | Buy Now |
| Jumper Wires | Few | Buy Now |
| Breadboard | 1 | Buy Now |
What is a 16×2 LCD Display?
A 16×2 LCD is a type of alphanumeric display that can display 16 characters per row and 2 rows. It is commonly used in various electronic devices such as calculators, digital clocks, and small embedded systems to display text and numbers.
The “16×2” specification refers to the number of characters that can be displayed on the screen, with 16 characters being displayed on each of the two rows. The LCD display itself typically consists of a grid of pixels, with each pixel being able to display a character or symbol.

Specifications
- Display size: A 16×2 LCD display has 16 characters per row and 2 rows, allowing for a total of 32 characters to be displayed.
- Display technology: 16×2 LCD displays typically use Twisted Nematic (TN) technology, which is a common LCD technology used in many other types of displays.
- Display resolution: The display resolution of a 16×2 LCD is 5×8 dots per character, which means that each character is made up of 5 pixels wide by 8 pixels high.
- Operating voltage: The operating voltage for most 16×2 LCD displays is usually between 4.5V and 5.5V, although some may operate at different voltages.
- Operating temperature: 16×2 LCD displays typically have an operating temperature range of -20°C to 70°C, which makes them suitable for use in a wide range of environments.
Features
- Alphanumeric display: A 16×2 LCD display can display both text and numbers, making it versatile for a wide range of applications.
- Backlighting: Many 16×2 LCD displays come with built-in backlighting, which makes them easy to read in low-light conditions.
- Low power consumption: LCD displays consume very little power compared to other types of displays, making them ideal for battery-powered applications.
- Compact size: 16×2 LCD displays are small and compact, making them easy to integrate into various devices without taking up too much space.
- Easy to interface: Most 16×2 LCD displays use a parallel interface, which makes them easy to interface with most microcontrollers and embedded systems.
Pinout

16×2 LCD Pinout Configuration
| Pin No: | Pin Name: | Description |
| 1 | Vss (Ground) | Ground pin connected to system ground |
| 2 | Vdd (+5 Volt) | Powers the LCD with +5V (4.7V – 5.3V) |
| 3 | VE (Contrast V) | Decides the contrast level of display. Grounded to get maximum contrast. |
| 4 | Register Select | Connected to Microcontroller to shift between command/data register |
| 5 | Read/Write | Used to read or write data. Normally grounded to write data to LCD |
| 6 | Enable | Connected to Microcontroller Pin and toggled between 1 and 0 for data acknowledgment |
| 7 | Data Pin 0 | Data pins 0 to 7 form an 8-bit data line. They can be connected to Microcontroller to send 8-bit data. These LCD’s can also operate on the 4-bit mode in such case Data pins 4,5,6 and 7 will be left free. |
| 8 | Data Pin 1 | |
| 9 | Data Pin 2 | |
| 10 | Data Pin 3 | |
| 11 | Data Pin 4 | |
| 12 | Data Pin 5 | |
| 13 | Data Pin 6 | |
| 14 | Data Pin 7 | |
| 15 | LED Positive | Backlight LED pin-positive terminal |
| 16 | LED Negative | Backlight LED pin negative terminal |
Circuit Diagram
The following circuit shows you the connection of the 16×2 LCD Display with Arduino Please make the connection carefully
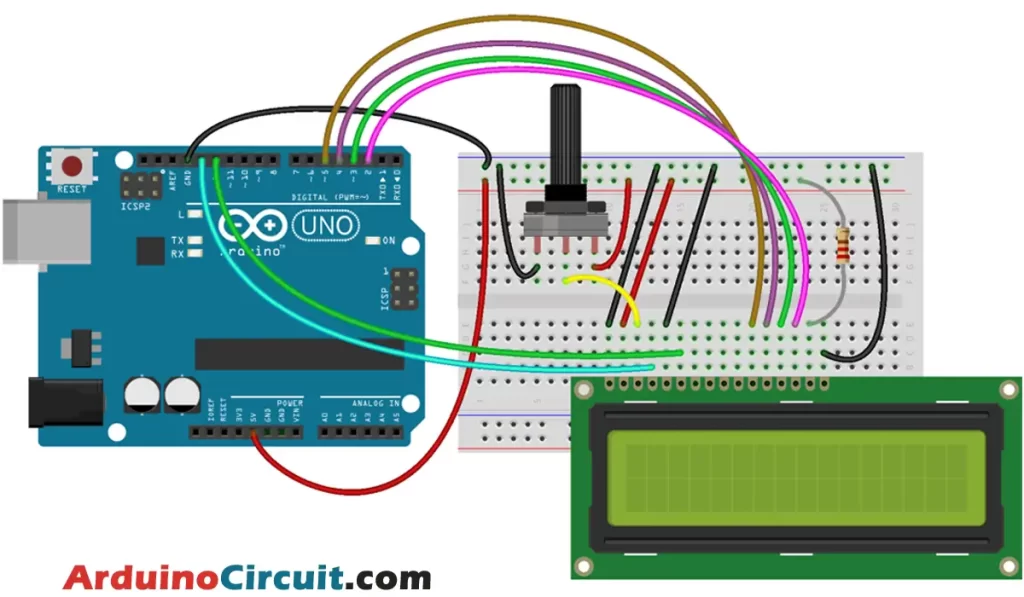
Circuit Connections
The brightness of the LCD is controlled by the 10kΩ potentiometer the first and third pin of the potentiometer is connected to the VCC and GND of Arduino. and the second pin is attached to pin 3 of the LCD. the first pin and third pins of the potentiometer can be interchanged.
The 1, 4, and R / W pin of the LCD is connected to the GND of Arduino, and Pin 2 of the LCD is connected to the + VCC of Arduino with 220Ω resister. Pin E (Enable), and RS pin of the LCD is connected to digital pin D11 and D12 of Arduino, and the D4, D5, D6, and D7 of the LCD is connected to D5, D4, D3, and D2 pins of Arduino
Installing Arduino IDE Software
First, you will require to Download the updated version of Arduino IDE Software and Install it on your PC or laptop. if you Learn How to install the Arduino step-by-step guide then click on how to install Arduino Button given Blow
Installing Libraries
Now when you are Ready to upload the code, to the Arduino Board you will need first to add the Following Libraries in Arduino, If you Learn How to add the library in the Arduino step-by-step guide click on how to install the library Button given Blow
Code
//For more Projects: www.arduinocircuit.com

//Include the library that we will use to control the display:
#include <LiquidCrystal.h>

// We initialize the library by assigning card pins
// to the pins required to interface with the LCD display
const int rs = 12, in = 11, d4 = 5, d5 = 4, d6 = 3, d7 = 2;
LiquidCrystal lcd(rs, en, d4, d5, d6, d7);

void setup() {
  // We initialize the screen with the number of columns and rows
  lcd.begin(16, 2);
  // Print a message on the display
  lcd.print("Hello world");
}

void loop() {
  // Set the cursor to column zero and line 1
  // (note: line 1 is actually in seconds, since the count starts at 0):
  lcd.setCursor(0, 1);
  // We print the milliseconds elapsed since the last reset:
  lcd.print(millis() / 1000);
}
Applications
- Calculators: 16×2 LCD displays are commonly used in calculators due to their compact size and ability to display both numbers and text.
- Digital clocks: The ability to display the time and date on the LCD display makes it ideal for digital clocks and alarm clocks.
- Medical equipment: Many medical devices use 16×2 LCD displays to display vital signs, measurements, and other important information.
- Industrial control systems: 16×2 LCD displays are commonly used in industrial control systems to display important process variables, such as temperature, pressure, and flow rate.
- Automotive systems: LCD displays are also used in automotive applications, such as dashboard displays, GPS navigation systems, and multimedia systems.
- Consumer electronics: Many consumer electronics devices, such as digital cameras, MP3 players, and handheld game consoles, use 16×2 LCD displays to display information and user interface elements.
- Home automation: LCD displays are also used in home automation systems, such as smart thermostats, to display temperature and other system information.
Conclusion
The 16×2 LCD Display is a very useful component for displaying information in Arduino projects. With its simple interface and easy-to-use libraries, it can be used for a variety of applications. In this article, we covered the basics of how to connect and use the 16×2 LCD Display with an Arduino, including displaying text and custom characters.
Some of the applications of the 16×2 LCD Display include displaying sensor readings, menu interfaces, and data logging. With its ability to display both text and custom characters, it can be used for a wide range of projects.
Overall, the 16×2 LCD Display is a versatile and useful component that can greatly enhance the functionality of Arduino projects. Its ease of use and compatibility with Arduino makes it an excellent choice for beginners and experienced users alike.
See Also


