Introduction
The Arduino laser alarm anti-theft barrier is a security system that uses an Arduino microcontroller, a laser module, and a photoresistor to create a laser barrier that can detect unauthorized access and trigger an alarm. The system works by shining a laser beam across a doorway or an entry point and using the photoresistor to detect any interruption in the beam. If the beam is broken, the Arduino triggers a buzzer and a red LED to alert the user of an attempted break-in.
Hardware Required
| Components | # | Buy From Amazon |
|---|---|---|
| Arduino UNO | 1 | Buy Now |
| Photoresistor (LDR) | 1 | Buy Now |
| Laser Module | 1 | Buy Now |
| Buzzer | 1 | Buy Now |
| LED (Red and Green) | 2 | Buy Now |
| Resistors 220KΩ | 3 | Buy Now |
| Resistors 10KΩ | 1 | Buy Now |
| Button | 1 | Buy Now |
| Jumper Wires | Few | Buy Now |
| Breadboard | 1 | Buy Now |
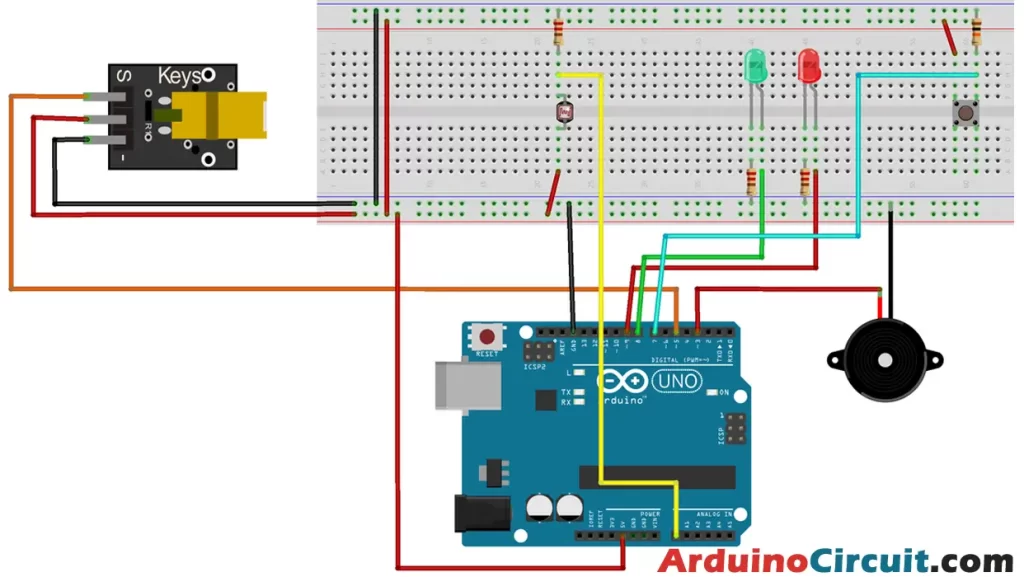
Circuit Diagram

Working Explanations
The Arduino laser alarm anti-theft barrier works by first connecting the laser module and the photoresistor to the Arduino using a breadboard and jumper wires. The laser module emits a beam of light across the entry point, which is then detected by the photoresistor. When the beam is uninterrupted, the photoresistor reads a high value, indicating that the system is secure.
If the beam is interrupted, the photoresistor detects a drop in voltage and sends a signal to the Arduino. The Arduino then triggers a buzzer and a red LED to alert the user of an attempted break-in. Additionally, a green LED indicates that the system is armed and functioning properly.
To arm the system, the user can press a button that triggers the Arduino to turn on the laser module and the green LED. If the user needs to disarm the system, they can press the same button again which turns off the laser module and the green LED.
Installing Arduino IDE Software
First, you will require to Download the updated version of Arduino IDE Software and Install it on your PC or laptop. if you Learn How to install the Arduino step-by-step guide then click on how to install Arduino Button given Blow
Code
//For more Projects: www.arduinocircuit.com

// We define some constants
const int red = 9;
const int green = 8;
const int button = 7;
const int laser = 5;
int state=0; // When opened, the system is off
int val=0; // Store the value of the state between cycles
int light;
void setup() {
pinMode(green, OUTPUT); // I initialize the green led output.
 pinMode(red, OUTPUT); // I initialize the red led output.
 pinMode(button, INPUT); // I initialize the output of the button's input pins
 pinMode(laser, OUTPUT);
 pinMode(A0,INPUT);
}

 void loop() {
 val = digitalRead(button); // Read the state of the signal
 delay(5);

 if (val == HIGH) { // we keep the value
 state = 1 - state; // of the choice made with the button.
 }

 if (state == HIGH) { // If I press the button I turn on the system
 digitalWrite(red, LOW);
 digitalWrite(green, HIGH);
 digitalWrite(laser, 1);
 light = analogRead(A0);

 if (light<100) {
 tone(3, 500);
 }

 }

 else { // If I press the button, I turn the red red and turn off the system
 noTone(3);
 digitalWrite(green, LOW);
 digitalWrite(red, HIGH);
 digitalWrite(laser, 0);
 }
}
Applications
The Arduino laser alarm anti-theft barrier has a variety of applications,
- this circuit is using for in-home security.
- It also, use in office security and garage security.
- It can be easily customized to fit different entry points
- and can be programmed to trigger different responses based on the user’s needs.
Conclusion
In conclusion, the Arduino laser alarm anti-theft barrier is an effective and low-cost security system that can provide peace of mind to homeowners, office owners, and anyone looking to secure their property. With a few simple components and some programming knowledge, anyone can create their own laser alarm system and keep their belongings safe.


